

Anıl Tuluy
Blog Post
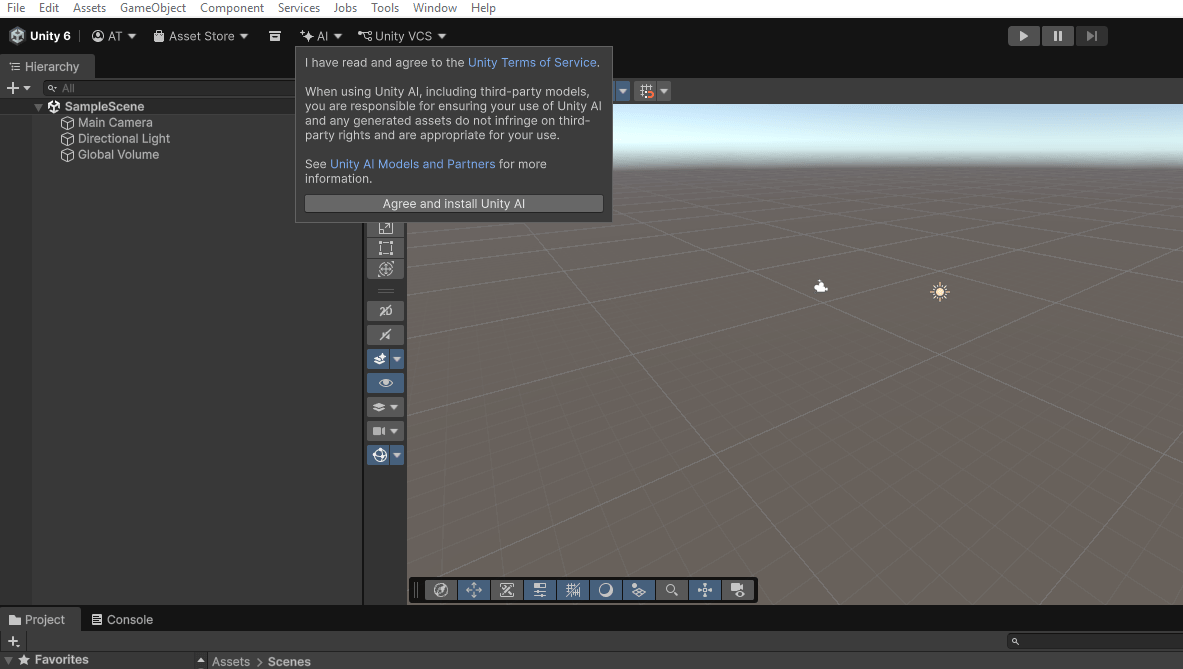
Installing Unity AI
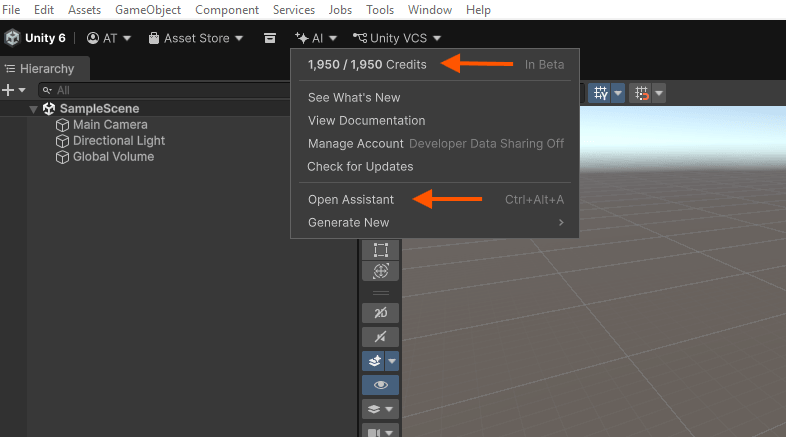
Credits
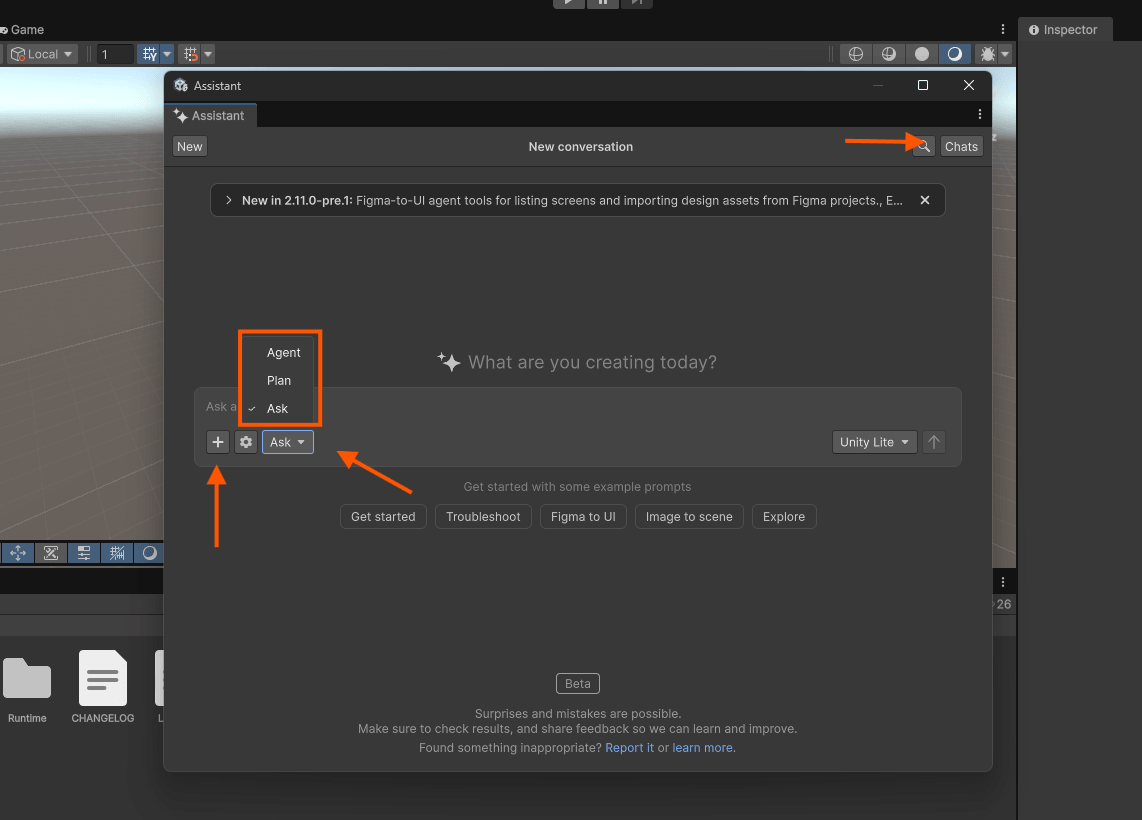
AI Assistant Window and Modes
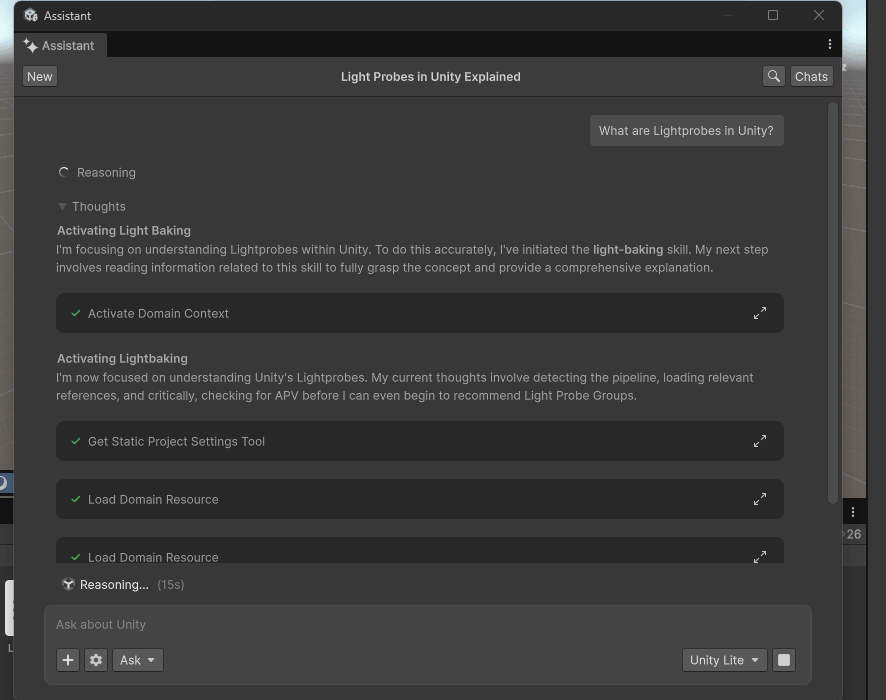
Asking a Question
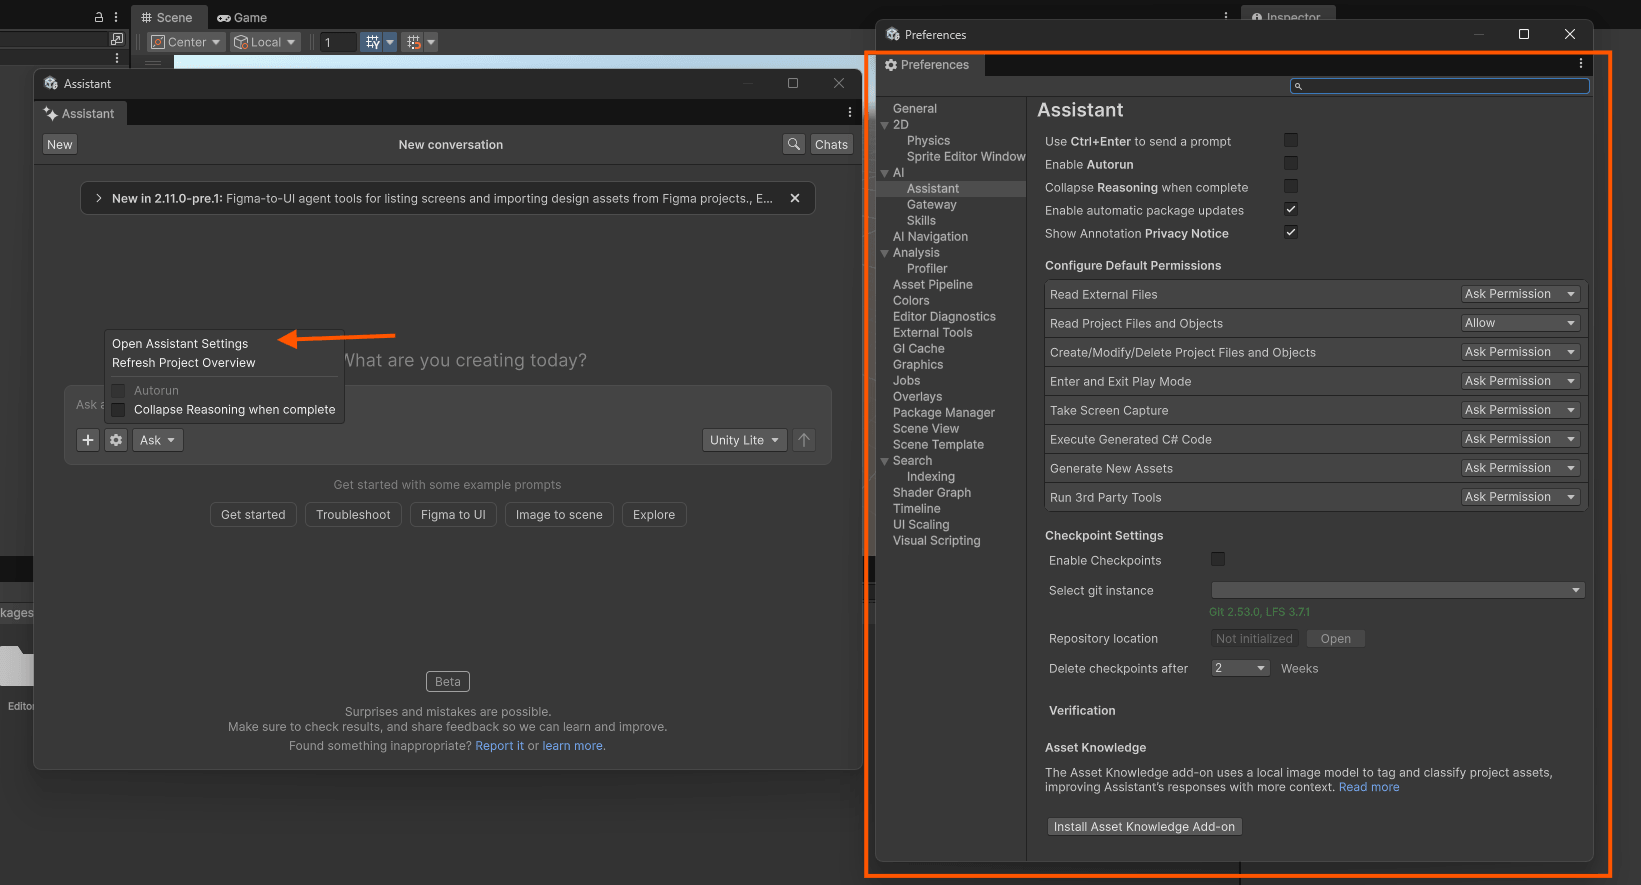
Unity AI Assistant Settings
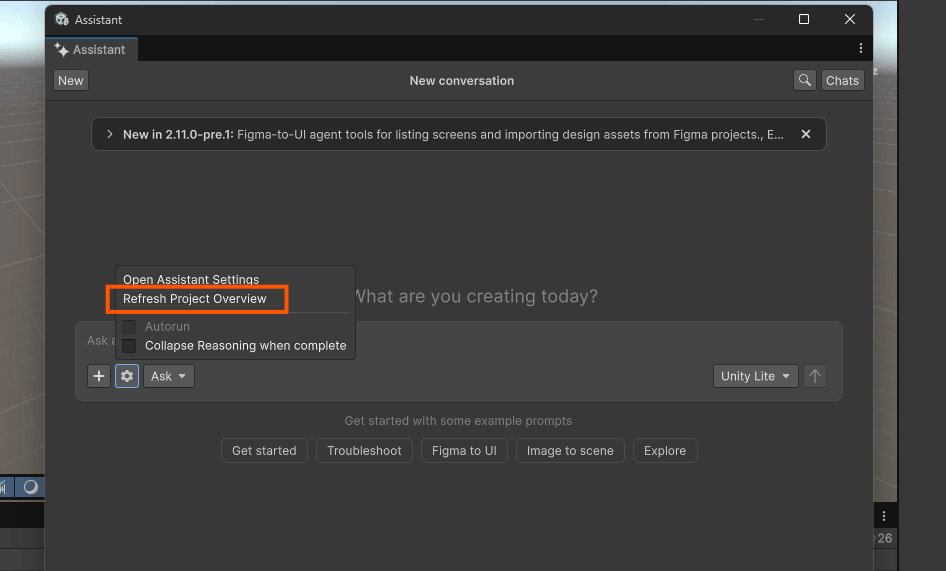
Refresh Project Overview
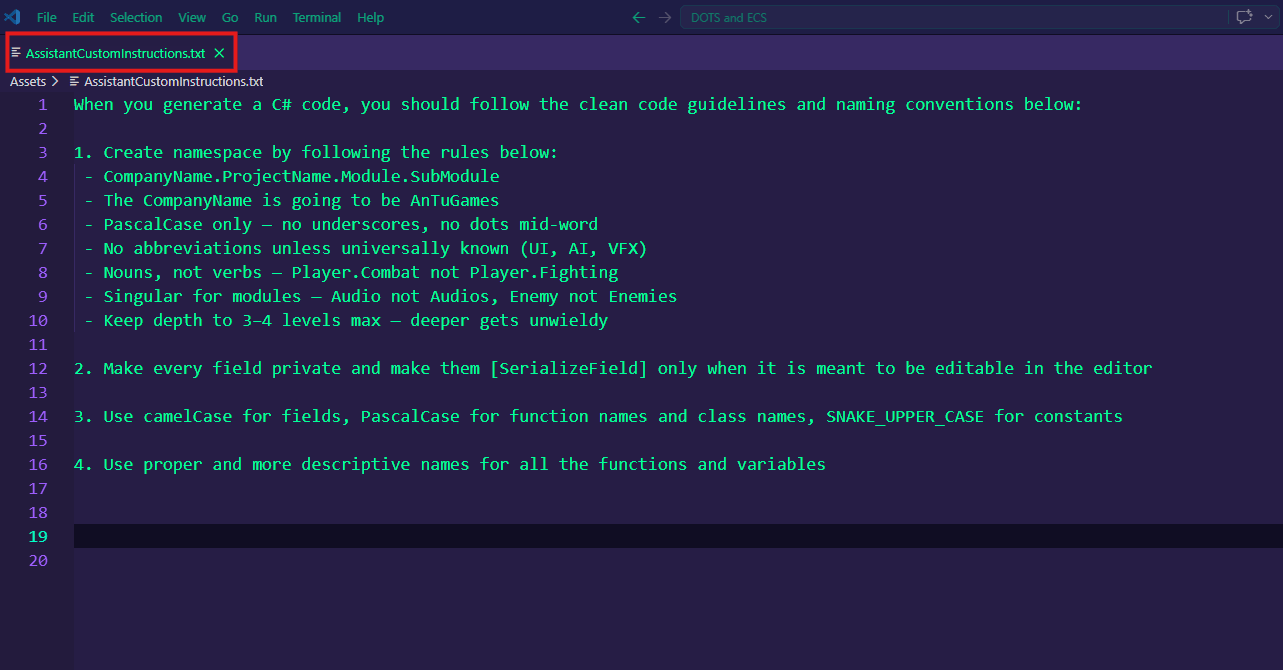
Assistant Custom Instructions
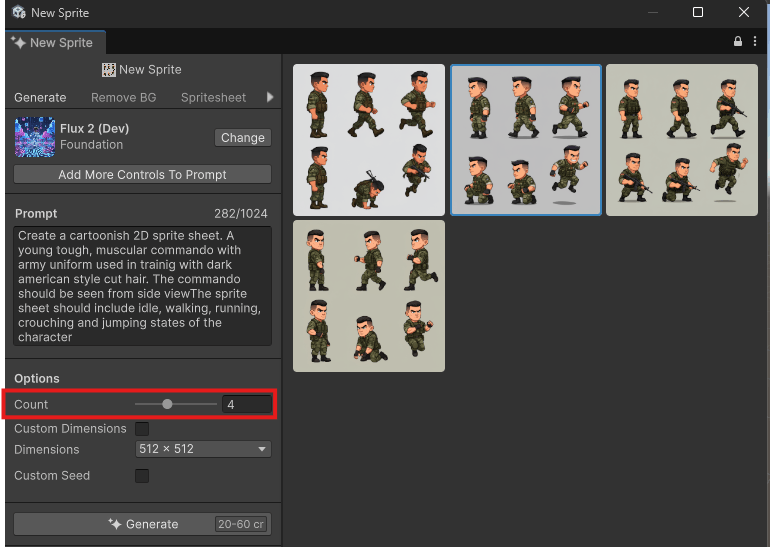
Example Sprites Created In Unity AI
I Tried Unity AI
ON JUNE 04, 2026 / ARTIFICIAL INTELLIGENCE
I’ve been trying to work with the new Unity AI features lately, so I wanted write my raw notes and thoughts here. It’s not a formal, or a very technical review—just an honest look at what works, how it feels, and how to actually use it in a real project workflow.
Getting Started & The Cost
First things first: you need Unity 6.3 or above to even see these tools. Also, your project has to be linked to the Unity Cloud, otherwise it won’t work.
When I signed up for the free trial, I got 1950 Credits. My first question to the Assistant was about Light Probes. I used the “Ask” mode and got a decent reply about what lightprobes are and how to use it and the assistant even suggested me tO use Adaptive Probe Volumes (APV) which is the newer and significantly better alternative to traditional Light Probes in Unity. All this procedure used up 3 credits.
The Three Modes
The prompts can be given in three modes. You can select either of them depending on your workflow and what you’re trying to do:
Ask Mode: Just a straightforward text-based Q&A. You ask a question, you get a text response back.
Plan Mode: This is for mapping out structural changes in your project before actually making them.
Agent Mode: The heavy lifter. This is where you let the AI take actions and execute plans directly inside your project.
Attachments
This is one of the coolest parts. By hitting the plus (+) icon, you can feed the AI a lot of contextual information like:
Project Assets: You can attach scripts, prefabs, profiler snapshots or even error messages straight from the console. If you drop a script in and ask what it does, it breaks down its purpose with a very detailed explanation.
External Files: You can attach raw files like PNGs from completely outside your project directory.
Visual Guidance: You can take a screenshot of your open Editor window or your entire desktop. You can even annotate a specific object within a screenshot of the scene view and tell the AI: “Find this object in the project and make changes to it” (like adding a new material or attaching a script). It actually bridges the gap between seeing an asset and modifying it.
Managing Project Context
AI tools are only as good as the context you give it. Unity handles this with a couple of solid features:
Project Overview: You can click the gear icon and hit “Refresh Project Overview” after making changes. It scans everything and generates a clean markdown file summarizing your architecture. This is a massive timesaver if you’ve just joined a project as a new developer or if you’re trying to understand a template you downloaded from the Asset Store. You can simply ask the Assistant, “What is this project about?” or even “What changes or optimizations should be done based on this project overview?”
Asset Knowledge: You turn this on in the AI Settings (via the gear icon). It indexes, tags, and classifies every single asset in your project. Once it’s built, Unity AI can easily find an object within your project even if you give it nothing but an image of the object.
Custom Instructions:This functionality is incredibly important. Once you generate a custom instructions file, you can force the AI to follow your exact coding style, tell it to keep its answers short, or enforce specific architectural rules. (You can give it instructions to reply to you like Yoda 🙂 ). Although they operate at different levels of scope and workflow it serves to a highly similar purpose like Claude.md file in Claude Code.
Checkpoints: Working with AI in your project can feel risky, but if you enable Checkpoints, you don’t have to be scared of making mistakes during major changes. Every time you send a prompt, a checkpoint is automatically created to save all open scenes and assets. If the AI messes up, you just restore the checkpoint and overwrite the current project state back to safety.
Profiler Assistance: Unity actually integrated an “Ask AI” button inside the Profiler (starting in version 6.4). You can capture the highlights within the profiler, feed it to the AI, and ask questions regarding optimizations for the whole game or specific bottlenecks visible in the graphs. It can even help rectify these performance issues.
Tooling & Prototyping: You can ask the assistant to build Custom Editor Tools tailored to your specific project needs. For level design, you can pass it some reference images and ask for a quick level creation to use as a draft prototype (it can utilize tools like ProBuilder for this).
Generative Features: Beside coding, it has options for generating sprites, 3D objects, animations, audio, textures, and cubemaps. You can also ask the assistant to create step-by-step guides on how to use specific packages or tools installed in your project to learn them faster.
Best Practices to Get Good Results
Just like with any AI tool, you have to know how to talk to it:
Chunk your tasks: Don’t ask it to build a massive system all at once. Break problems down and give specific tasks in chunks.
Be descriptive: Give details and be highly specific about what you need.
Invite clarification: Explicitly tell the AI in your prompts: “Ask me questions for clarifications before you proceed.”
Lock down rules: Use the AssistantCustomInstructions file early on to force it to follow your personal coding rules.
Overall, it’s an interesting addition to the editor. I hope that it will be used more like an integrated partner and a teaching assistant than a tool which will create everything by itself.
I Tried Unity AI
ON JUNE 04, 2026 / ARTIFICIAL INTELLIGENCE
I’ve been trying to work with the new Unity AI features lately, so I wanted write my raw notes and thoughts here. It’s not a formal, or a very technical review—just an honest look at what works, how it feels, and how to actually use it in a real project workflow.
Getting Started & The Cost
First things first: you need Unity 6.3 or above to even see these tools. Also, your project has to be linked to the Unity Cloud, otherwise it won’t work.
When I signed up for the free trial, I got 1950 Credits. My first question to the Assistant was about Light Probes. I used the “Ask” mode and got a decent reply about what lightprobes are and how to use it and the assistant even suggested me tO use Adaptive Probe Volumes (APV) which is the newer and significantly better alternative to traditional Light Probes in Unity. All this procedure used up 3 credits.
The Three Modes
The prompts can be given in three modes. You can select either of them depending on your workflow and what you’re trying to do:
Ask Mode: Just a straightforward text-based Q&A. You ask a question, you get a text response back.
Plan Mode: This is for mapping out structural changes in your project before actually making them.
Agent Mode: The heavy lifter. This is where you let the AI take actions and execute plans directly inside your project.
Attachments
This is one of the coolest parts. By hitting the plus (+) icon, you can feed the AI a lot of contextual information like:
Project Assets: You can attach scripts, prefabs, profiler snapshots or even error messages straight from the console. If you drop a script in and ask what it does, it breaks down its purpose with a very detailed explanation.
External Files: You can attach raw files like PNGs from completely outside your project directory.
Visual Guidance: You can take a screenshot of your open Editor window or your entire desktop. You can even annotate a specific object within a screenshot of the scene view and tell the AI: “Find this object in the project and make changes to it” (like adding a new material or attaching a script). It actually bridges the gap between seeing an asset and modifying it.
Managing Project Context
AI tools are only as good as the context you give it. Unity handles this with a couple of solid features:
Project Overview: You can click the gear icon and hit “Refresh Project Overview” after making changes. It scans everything and generates a clean markdown file summarizing your architecture. This is a massive timesaver if you’ve just joined a project as a new developer or if you’re trying to understand a template you downloaded from the Asset Store. You can simply ask the Assistant, “What is this project about?” or even “What changes or optimizations should be done based on this project overview?”
Asset Knowledge: You turn this on in the AI Settings (via the gear icon). It indexes, tags, and classifies every single asset in your project. Once it’s built, Unity AI can easily find an object within your project even if you give it nothing but an image of the object.
Custom Instructions:This functionality is incredibly important. Once you generate a custom instructions file, you can force the AI to follow your exact coding style, tell it to keep its answers short, or enforce specific architectural rules. (You can give it instructions to reply to you like Yoda 🙂 ). Although they operate at different levels of scope and workflow it serves to a highly similar purpose like Claude.md file in Claude Code.
Checkpoints: Working with AI in your project can feel risky, but if you enable Checkpoints, you don’t have to be scared of making mistakes during major changes. Every time you send a prompt, a checkpoint is automatically created to save all open scenes and assets. If the AI messes up, you just restore the checkpoint and overwrite the current project state back to safety.
Profiler Assistance: Unity actually integrated an “Ask AI” button inside the Profiler (starting in version 6.4). You can capture the highlights within the profiler, feed it to the AI, and ask questions regarding optimizations for the whole game or specific bottlenecks visible in the graphs. It can even help rectify these performance issues.
Tooling & Prototyping: You can ask the assistant to build Custom Editor Tools tailored to your specific project needs. For level design, you can pass it some reference images and ask for a quick level creation to use as a draft prototype (it can utilize tools like ProBuilder for this).
Generative Features: Beside coding, it has options for generating sprites, 3D objects, animations, audio, textures, and cubemaps. You can also ask the assistant to create step-by-step guides on how to use specific packages or tools installed in your project to learn them faster.
Best Practices to Get Good Results
Just like with any AI tool, you have to know how to talk to it:
Chunk your tasks: Don’t ask it to build a massive system all at once. Break problems down and give specific tasks in chunks.
Be descriptive: Give details and be highly specific about what you need.
Invite clarification: Explicitly tell the AI in your prompts: “Ask me questions for clarifications before you proceed.”
Lock down rules: Use the AssistantCustomInstructions file early on to force it to follow your personal coding rules.
Overall, it’s an interesting addition to the editor. I hope that it will be used more like an integrated partner and a teaching assistant than a tool which will create everything by itself.